Friday, December 22, 2017

The value ‘XXXXX"' is not found in the map in Dynamics 365 Finance and operations

HI All,
I have just upgraded my customized  module  from Ax 2012 R3 CU11 to Microsoft Dynamics 365 for Finance and Operations, Enterprise edition (July 2017).

I have solved the errors and application is error free.

All others forms working find apart from Parameter form(Customized new parameter form).

Problem:
I am getting the error while opening a Customized new parameter form .

The value ‘XXXXX"' is not found in the map.

Cause:
This is caused due to number sequence issue while creating a new module in D 365.
The number sequence class that we create for our new module should subscribe to NumberSeqGlobal delegate buildModuleMapDelegate. 

Solution:

open the number sequence module class  and add the below code .

My number sequence class name is NumberSeqModuleABS

//
/// Appends the current class to the map that links modules to number sequence data type generators.
///

[SubscribesTo(classstr(
NumberSeqGlobal),delegatestr(NumberSeqGlobal,buildModulesMapDelegate))]
static void buildModulesMapSubsciber(Map numberSeqModuleNamesMap)
{
   NumberSeqGlobal::addModuleToMap(classnum(
NumberSeqModuleABS), numberSeqModuleNamesMap);
}

compile again your model and open now it will work.


Thanks & Regards
Naresh.D


Wednesday, September 27, 2017

How to organize projects by element type in D365 operations

Hi All,


when developing a new solution in Dynamics 365 for Operations. After adding so many new elements I observed that they were just being added to the project solution and were not being categorized. 
It is recommended to categorized the elements by type for each and every solutions.
for that i manually created folders and moved those objects to respective folders. because in Previous versions of Ax  also we used to do for the same.
but it is very difficult to move those manually ,especially if there are a large number of elements in the solution. 
Solution:
we can organize elements  automatically with a simple steps.But this will work for only new solutions . if you already have elements in your project they won’t get organized.
Step 1:
Go to  the Dynamics 365 tab in Visual studio and select Options.


Expand Dynamics 365 Tab --> Click on Projects -->and check on Organize projects  by element  type


Once you set this option enabled,now onward no need to create folders manually ,when you add a new element folder will create automatically. 


How to start and Stop AOS Service in D365

Hi All,

As we all aware, if we wanted to start/restart and stop the AOS service in previous versions of Dynamics AX, we have to  open services console and we can perform start or stop.

But In Dynamics 365,we are accessing application through a web site, so that it has been changed to IIS.


We can start or stop the AOS through IIS .


Go to IIS-Server-->Sites-->AOS Service.

we have right side Manage Website,here we can perform the actions like Restart,start or stop.


Thursday, August 31, 2017

D365: Error while trying to open table browser in Visual studio

Hi All,

When I am trying  to open table through  table browser  option in visual studio i am getting  the following error.

Problem : Unspecified error (Exception from HRESULT: 0x80004005 (E_FAIL))


Cause:

If you use ‘Get latest’ in Source Control Explorer for the model Directory you might get a problem with using the table browser from Visual Studio. 

Solution:
This can be fixed by doing the following operations:

1.      Restart Visual Studio
2.      Open a solution
3.      Open the Application Explorer
4.      Right click AOT and select Refresh. Do this twice.

The table browser should work after this.


Thanks  & Regards
Naresh.D


Wednesday, May 24, 2017

How to Solve Task Recorder Error in Dynamics 365

Hi,
Like earlier versions of AX ,D 365 also having the Task Recorder  tool.We can use Task Recorder for recording business process in client.it may use as end user guide as well.

Problem :

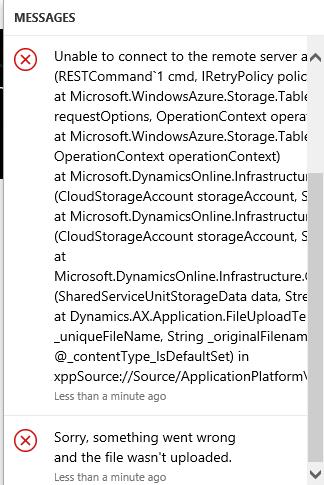
In D365 ,when you are using Task recorder first time and saving the recording ,you may get the following error like  Unable to connect to Azure storage.


Error text:
Sorry, something went wrong and the file wasn't downloaded. 
Sorry, something went wrong and the file wasn't uploaded. 
Unable to connect to the remote server at Microsoft.WindowsAzure.Storage.Core.Executor.Executor.ExecuteSync[T](RESTCommand`1 cmd, IRetryPolicy policy, OperationContext operationContext) at Microsoft.WindowsAzure.Storage.Table.CloudTable.Exists(Boolean primaryOnly, TableRequestOptions requestOptions, OperationContext operationContext) at Microsoft.WindowsAzure.Storage.Table.CloudTable.CreateIfNotExists(TableRequestOptions requestOptions, OperationContext operationContext) at Microsoft.DynamicsOnline.Infrastructure.Components.TableAccessor.TableStorageAccessor.PerformOperation(CloudStorageAccount storageAccount, String tableName, Func`1 operation) at Microsoft.DynamicsOnline.Infrastructure.Components.TableAccessor.TableStorageAccessor.AddRecord[T](CloudStorageAccount storageAccount, String tableName, T record) at Microsoft.DynamicsOnline.Infrastructure.Components.SharedServiceUnitStorage.SharedServiceUnitStorage.UploadData(SharedServiceUnitStorageData data, Stream stream) at Dynamics.AX.Application.FileUploadTemporaryStorageStrategy.completeUpload(Boolean _blobAlreadyExists, String _uniqueFileName, String _originalFilename, String _fileId, Stream _stream, String _contentType, Boolean @_contentType_IsDefaultSet) in xppSource://Source/ApplicationPlatform\AxClass_FileUploadTemporaryStorageStrategy.xpp:line 135

Cause:
Not able to  connect to Azure storage.
The “AzureStorageEmulator.exe” service was  not running on the machine
Solution : we need to do the following steps to start the service .
click on windows start  and find the Microsoft azure Emualator.

will get new window for permission to start click on Yes and continue.
now in below screen shot,we can observer that the storage emulator was successfully started.  

Installing and running the “AzureStorageEmulator.exe” service resolved the issue.
we can find the some other commands as well in the screen shot to stop the service  and other operations.

By follow the above steps we can solve the Task recorder error,now we can use task recorder with out any errors. 


Tuesday, May 23, 2017

The user interface for Microsoft Dynamics 365 for Operations

As we know  user interface of D 365 has been  completely changed while compared with earlier versions of AX.

In earlier version we are using Ax client as application ,but in Dynamics 365 we can use the client from browser URL.

we can find lot of option from the new Dynamics 365 Home Page.

The main navigation options are listed below.

1.Dashboard
2.Company search/Company selection
3.Navigation search
4. Message Window
5.Feedback form
6.User Settings
7.Help  & Support
8.Account Settings
9. Navigation pane
10.Office 365 link
11.Dynamics 365 home page/portal
12.Operations for default dash board.


1. Dashboard :
The dashboard is the first page that we can see when we access the client. The dashboard contains tiles that show important details from the system. Previously we used to display Cues on Role Center pages in Microsoft Dynamics AX 2012 home page now the same  available on the dashboard. You can return to the dashboard at any time by clicking Operations (12).


2.Company search/Company selection :

Company selection is for selecting the desired company like earlier versions. we can get both drop down of he company list  for selection or we can directly search with the company id.


3.Navigation search :

Navigation search is one of the useful option in D 365 we can directly search the desired form ,we if we don't know the path.this intelligence will give the multiple option to select the required form. 


4. Message Window : 
Message window is used save all messages like info,warnings and errors,this is similar to message windows of earlier versions.

but in earlier versions there will be a separate window form will open to display all messages. but in we can find  all messages in message window pane.

but the functionality will be same for both the versions,these saved messages will  get cleared one the session is expired(if close and  open the client),similarly in earlier versions.


5.Feedback form :
we can send the feed back about the application .you like  or  dislike  along with the comments.But i am not sure where can i see our comments and feed back.But it will capture all your session details.


6.User Settings  :
Under the user setting, we can find some of the tools,which are available in earlier versions too.

User options : is used for  setting up user default values like start up company,currency  and  reset usage data like earlier versions.we can discuss more details  about user options in later sessions.

Task recorder :Task recorder is also available in earlier version but here we an find some extra features related to task recorder like editing the recent task recorder.So we can discuss more about Task recorder in separate session.


Mobile apps: We can create new mobile apps using this.and also edit the existing mobile apps.
Trace  : Trace is a tool to search with the desired words ,like in Ax 2009 data crawler.but here in                       D365 we can download the trace  and upload the trace.


About: It will provide version information and loaded models and package details.


7.Help  & Support :

Help : Help will redirected to Dynamics 365 for Operations Help Wiki,based on your search.

Support : Support will redirected to Life cycle service  for support .


8.Account Settings :

Here we can find  the current user login account details and sign out button as well.


9. Navigation pane :

The user can open the navigation pane by clicking the Show navigation pane button under the navigation bar.(9)
The navigation pane provides access to work spaces, main menu elements, recently opened forms, and user-defined favorites. 
The navigation pane consists of four collapsible sections as listed below.

1.Favorites 
2.Recent 
3.Work spaces
4.Modules 

The Favorites section provides quick access to the list of forms the user has explicitly marked as a favorite. Marking a form as a favorite is accomplished by clicking the star icon next to the form in the navigation pane. 

The Recent section lists the forms the user has most recently visited.

The set of work spaces a user has access to is conveniently shown in the Work spaces section. 

The Modules section provides the full list of modules. Clicking on a module will open the right side of the navigation pane, where the user can navigate to the desired page in that module. 


10.Office 365 link :
Office 365 link will redirected  office.come  which we can find all available office  apps  like outlook word excel etc. as shown in the below screen shot.


11.Dynamics 365 home page/portal :

   Dynamics 365 home page will redirected to home.dynamics .com,where we can find the all other available dynamics apps.


12.Operations for default dash board :


Operation  button is allays bring back your application to default dash board. 


Ps:for more information please refer the below link.

https://docs.microsoft.com/en-us/dynamics365/operations/dev-itpro/user-interface/page-navigation


Step by step to connect to D365 for Operations VM

Step 1: We have to download the D365 for Operations Zip files from partner source to install the                      VM.

Step 2 : By extracting the file 1, we can get the VHD file.

Step 3 :  Install oracle virtual machine and attached .vhd file which has generated in Step 2.


Step 4 : Dynamiccs 365 operations VM.


Step  5 : Before working with D 365 operations, we need  onmicrosoft Account.
We can create new account from the following sign up page.

Once account create, save the details  we need these details later. Please   find the below screen shot for the same.


Step 6 : Once account created successfully,come back to VM desktop and right click on “AdminUserProvisioning
Click on “Run as administrator”


Click “YES” to proceed further.


Step 7: Please enter the onmicrosoft account email id, which has created on Step 5.


Step 8 : Click on submit and wait for result.(Note it may take several minutes)


You can observer  here, admin user is updated to “your account”.

Step 9: Open internet explorer and select the url from the drop down of address bar.


Step 10: It will redirected to login page for ERP.
               Please enter the onmicrosoft account credentials which have created in Step 5.


Step 11: On success login you can see the D365 operation home screen on your browser.
In D365 work space is moved to browser and development work space is moved to Visual studio.


Step 12: 

In D365 , Development environment moved to Visual studio. In windows search, search for visual studio  and right click on “ Visual studio 2015” and click on “Run as Administrator
“Run as Administrator” is mandatory in this version.
(Current version  I am working is D365 update 5)

Click on “Yes” to continue further.


Step 13 : To continue with the development work space, we need product key(temporary based we can do without product key)


Step 14: Product key is applied successfully. 


Step 15 : Now we can see the development environment.
We can find the D365 Tab in visual studio and AOT in application Explorer.


Note: onmicrosoft  account trail period is only one month,after one month this account will expire.

if account is expired again follow the same steps with creating new onmicrosoft for using the same VM.